Technical Reports
![]()
![]()
![]()
![]()
![]()
|
Technical Reports
|
Last update, August 14, 2001 Subjects: Custom adjusting clew hook. Full jib boom travel downwind. RMG / TX calibration checklist. Bow turning block and line problems
This is not very technical. You need to know something for that realm. These are noted items that prompt thought and maybe changes. It is to share a Dummy's view.
March
3, 2001. Elon, on the water.
Custom
adjusting clew hook. The
mainsail custom nickel silver wire clew adjuster, shown here and also shown in the EC12 Manual on
page 69C, is no longer recommended for use here at DMYC.
A
suit of TriSpi 40 Mylar sails by CarrSails was used in very light to nil air and
light rain conditions. This particular suit and sail set has been a good
performer in the past in these air conditions but never exposed to rain.
Problem: The clew area of the sails would not shape to one side or the other along with the body of the sail. The reinforced grommet and stress area of the clew would stand vertical on the adjuster causing a shape break in the foot of the sail and leaving the leech slack.
Conclusion and remedy: The very light rain beaded up on the sails creating weight. The stiffness of the clew support radius material, the lack of movement freedom by the adjusting hook through a thick washer supporting the attachment grommet and the added weight to the sails, prevented the sails from taking on their design shape. The rain added weight appears to have produced more friction on the clew hook than could not be overcome by the air conditions. The sails would perform whenever opportunity allowed the rig to be shaken by the winch. This violent action would shake shape into the sails at least till the next tack.
The
clew hook has been removed from both booms and a Spectra
string loop used to attach
the clew to the boom at a desired height. A line is then attached to the clew,
then through a a guide on the end of the boom to a D ring adjuster. This will
allow the clew area and the foot of the sail to seek its own level in light air
rain conditions. The sails should then move into their design shape.
Comment: Had this sail suit not performed in previous light air conditions, a different approach may have been taken. However, some consideration needs to be addressed to the number of rigs you are willing to carry and the discipline that is needed to take advantage of small range changes in conditions. Money can certainly be a limiting factor. The approach here was to improve the rig design. If this is a good change then it will be good for a broader range of conditions. In the course of this thought a new boom design is contemplated.
March
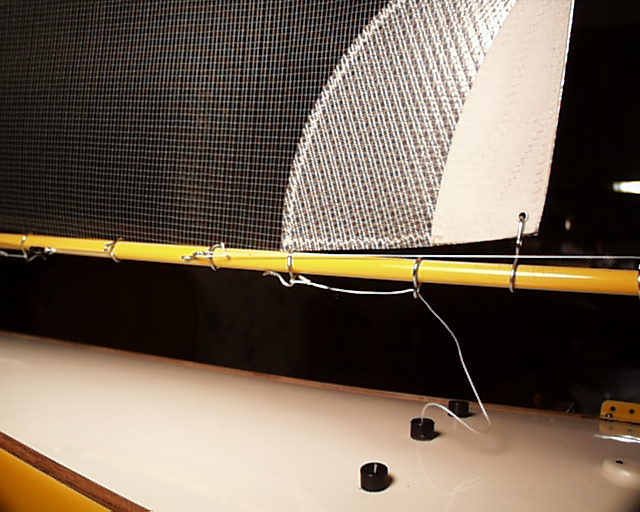
3, 2001. Elon, on the water. Full jib travel downwind.
Problem: In the conditions stated above, it was also found that the jib would not fully deploy outward to a “Wing on Wing” position. It should have with the use of the twitcher. It has in the past. About 60 degrees was all that could be achieved.
Conclusion: The added weight of the rain held the jib restricted. This appeared to be a function on gravity in that the boom rises, in an angled fashion, above the deck as it moves further outward. If the jib worked satisfactorily in previous light air conditions then it had to be the rain and the added weight.
The
only place that weight can be reduced on the jib is in the boom. To address this
issue and still continue to have a stiff boom
June 9, 2001, in the shop. RMG winch programming.
The User Manual for the RMG Smartwinch covers the programming of the winch well enough, however, something interesting happens when you do it a lot. Although the manual lists around 7 steps in the process, actually there are closer to 19. Seven winches have been installed here and programmed. One would think that the procedure is perfected. Wrong! It is a fact that at times the mind will think it is doing something, or hearing something, because it is anticipated. But in fact it did not happen. Before you query Rob Guyatt about a bum winch try this checklist. Do so without mistake and you may be surprised at the result.
Remember, you are instructing a simple software program. You need to be precise. Both checklists below are the same procedure. The first is a full printing that explains where and how the winch communicates. The second would be a handy printout for your tool box.
* RMG / TX Calibration ** Winch Maximum Travel limits * * Battery Use Limit * If at anytime during this procedure, you do not get the right response from the winch, TX and winch off and start over at the beginning. If at anytime during this procedure the winch responds with three rising tones (except 21b), TX and winch off and start over at the beginning. 1. TX stick and trim close-hauled. Note: Trim remains here throughout the procedure and during use. 2. Turn winch on. 3. After three quick beeps, TX on. 4. Winch responds with one long beep. It has noted the close hauled position 5. TX off. 6. Move stick to full sheet out. 7. TX on. 8. Winch responds with one long beep. It has noted the MAXIMUM full sheet out position 9. TX off. 10. Winch responds with 3 quick beeps. The winch is now calibrated to the TX stick for maximum turns and saved. 11. Move stick to close-hauled. 12. TX on. 13. Winch will sheet in then respond with 2 quick beeps. The winch acknowledges it has returned to where the stick is. 14. Move stick to check for full sheet out travel. 15. Move stick to check for full close-hauled travel. You can do this several times if you like. 16. When satisfied, move stick to the full sheet out position that you want for the sails. Check the travel again to make sure this is what you want. Leave the stick at YOUR full sheet out. 17. TX off. 18. Winch responds with 3 quick beeps. The winch travel settings are now saved. 19. Turn winch off…or leave it on for battery use limit options. To enable the battery use limit… 20a. TX on. 20b. The winch will respond with 3 quick beeps. The winch acknowledges you want a limit shutdown The winch will now go to 1/2 sheet out and freeze whenever the voltages drops to about 6.03 20c. Turn winch off. 20d. TX off. Done To disable the battery use limit… 21a. Quickly turn TX on, then off. 21b. Winch responds with 3 rising tones. The winch acknowledges you want NO limit shutdowns and will continue to operate till there is no power left in the battery 21c. Turn winch off. Done
Toolbox size * RMG / TX Calibration ** Winch Maximum Travel limits * * Battery Use Limit * If at anytime during this procedure, you do not get the right response from the winch, TX and winch off and start over at the beginning. If at anytime during this procedure the winch responds with three rising tones (except 21b), TX and winch off and start over at the beginning. 1. TX stick and trim close-hauled. Note: Trim remains here throughout the procedure and during use. 2. Turn winch on. 3. After three quick beeps, TX on. 4. Winch responds with one long beep. 5. TX off. 6. Move stick to full sheet out. 7. TX on. 8. Winch responds with one long beep. 9. TX off. 10. Winch responds with 3 quick beeps. 11. Move stick to close-hauled. 12. TX on. 13. Winch will sheet in then respond with 2 quick beeps. 14. Move stick to check for full sheet out travel. 15. Move stick to check for full close-hauled travel. You can do this several times if you like. 16. When satisfied, move stick to the full sheet out position that you want for the sails. Check the travel again to make sure this is what you want. Leave the stick at YOUR full sheet out. 17. TX off. 18. Winch responds with 3 quick beeps. 19. Turn winch off…or leave it on for battery use limit options. To enable the battery use limit… 20a. TX on. 20b. The winch will respond with 3 quick beeps. The winch will now go to 1/2 sheet out and freeze whenever the voltages drops to about 6.03 20c. Turn winch off. 20d. TX off. Done To disable the battery use limit… 21a. Quickly turn TX on, then off. 21b. Winch responds with 3 rising tones. 21c. Turn winch off. Done
Bow Turning Block and Line Failures #1494, Stowe, September 2000. Problem: The winch line collector ring failed as a result of a collision. The collector was replaced with just one DNF that was subject to re-dress. Statements were "Well, you should have a small line loop as a collector for the sheet lines." All drum winch boats at DMYC were refitted. #1494, Sun City, October 2000. Problem: The winch line jammed at the bow turning block during practice before a regatta. The 80# Spectra line wedged between the spool and the becket. It is not suppose to be able to do that. The becket was found to be bent slightly causing enough separation for the line to slip over the spool. The block was replaced. Statements were, "Well, a larger diameter line is supposed to be used." This failure was bench tested with the block wedged at odd angles and the line never left the edge of the spool. No changes were made. #1480, Delta, October 2000. Problem: The 80# Spectra tension line holding the bow turning block failed in moderate wind during a gybe at the leeward mark. This allowed the block and line to come forward onto the radio board. The line was frayed where it rounded the eye screw on the forward bulkhead. The block retrieval line was turned into a single loop and used to re-thread another tension line through the screw. The retrieval line was reattached and the system put back to original design. The boat is currently on the East Coast and we are worried about it. It will be refitted and checked before the 2001 Nationals. During June of 2001, at the River venue of DMYC, the three new drum winch boats began to have similar failures. First it was at the termination of the tension line on the hatch liner. This was corrected. Nonetheless, the replacement procedure was long and delicate. Most of the time was spent straighten out all the lines so there would be no line to line fraying. A second and backup line was planned to simplify the process and then such repairs could be done at the water if needed. #1599, Delta, July 2001, Region Championships. Problem: The 80# Spectra tension line failed during the pre-start. The boat was replaced for the rest of the regatta. During the repair of this boat, the retrieval line was used to install another tension line through the eye screw as above. The retrieval line was them removed and discarded. Another line loop was made to go through the eye screw and was loosely tape to the port side of the hull. Now there would be only one line through the eye screw and tied to the block. This tension line is now #80 Spiderwire. Complication of lines are less and therefore the block can be retrieved to the cockpit to check the conditions of the lines and sent back forward in less than five minutes. Also, the Bowline knot on the retrieval line now has a single over hand knot finish for good measure. This will be part of a pre-regatta boat check. Repair: Should the retrieval line break, the loop will feed another and you should be in the next race. Should the winch line break, the retrieval line will be slackened and gravity should bring the block into range. If not, a Grabber can be sent forward to get it. This will be quick, however, it will take longer to calibrate the knot location on the line to secure it to the drum. This is felt to be the fix for the existing boats. The tension line were fraying and breaking at the eye screw. While there is not suppose to be movement there, it is understood that some motion in some direction is likely. The frequency of these failures is a major concern here. Inspection of the eye screws in the parts bin that were used during the 2001 winter building showed that they were coated whereas, the 2000 boats had stainless steel. No friction tested were performed but it is thought that flaking of this coating is accelerating the failures. Nonetheless, the matter needs to be addressed. Failures of this type are devastating at the lake and a real turnoff to someone new to the hobby of the class. The design followed was not new but that shown in the EC12 Manual. Despite line loops for repair the system has weak points. Such failures should not happen and if by some lapse of judgment in building do fail a repair needs to be thought of in advance that is simple and swift. "Well, you should hard mount the turning block." "But what if the block fails?" "Never heard of one failing." "Did to me last year" Thirty days later the hard mount for a block failed. There was no fix for this boat short of cutting into the foredeck. However, craftsmanship and invention carried the day. (See the article) The interesting thing was that as soon as we starting asking around about such problems it is found that evolution has changed the design into several presentations. Yet here at DMYC there have never been any communications regarding constructive criticisms of construction methods presented on the website, much less that of the bow block installation. There have been some corrections to other areas that were gratefully received but none in construction. This is disappointment as we have been beginners to the class and dedicated this site to laymen builder issues. There was some thought to the problem as more experienced builders with longevity in the class stated that it was a problem and admitted to no foolproof installation procedure. It seems to boil down to one of two things, or both.
The complication of retrieval lines is removed. A larger diameter winch line could be used to offset jamming of the block as reported above. However, it is felt that since the block is now not tensioned against the mount it will always follow the winch line rather than appose it. Care should be take during construction to make sure the mount for the block is secure forever. Use Spiderwire rather than Spectra as it has a wax coating and lends to easier knot tying and is more resistant to fraying. Line abrasion is no longer an issue as the winch line is the only line of tension and it runs through the spool on the block. It is also thought that an eye screw should not be used as it can open up as it did below. A solid eye bolt or a small SS pad eye mount is part of the plan. Then a major structural failure would be needed to loose the bow block mount. So were the thoughts. #1494, Liberty Bell, August 2001. Problem: The sheeting in of the sails became restricted, the RMG 380 broke the tension line and everything ended up on the radio board. This was Saturday and the fifth race having score a bullet and the rest in the top five. Rick had flown in two days early to do a "Top-Down" on the boat and the rigs. #1494 is stored on the East Coast and was in good condition. This was the last straw and a snap decision was made. A 3 by 1-1/2" section of the foredeck was removed. Another tension line was sent forward on a rod, passed through the eye screw with tweezers and brought back to the cockpit. The retrieval line was cutoff and the block was sent forward and secured. The hole was covered with blue tape in time to meet the call for the next race with only one DNF which was thrown out. That night in the hotel, a piece of 30 mil acetate from a spare hatch cover was fashioned and sealed on the deck over the hole.
The following day the retrieval line came off the eye screw in drifting air conditions. The bow cover was removed and it was found that the eye screw was not completely closed and was down and away where you could not see it. It is thought that this opening occurred the day before as the winch stressed the eye screw. The line was reattach and the screw squeezed with pliers and the boat was back in the race before charged with a DNF. It is hoped you will not go through such an ordeal. #1494 managed an eighth despite all this frustration.
Comment: The five RMG winch boats at DMYC will have to live with this problem for some time or move to an access hatch on the deck and then refit all the boats. We had obviously not done our homework during 1999 before the first building phase. We obviously did not have our ear close to the ground in the time since. While we can see the future a bit better now we are still concerned about the process we have been through and why. It is hard to believe that all of it was our ignorance.
The new building this winter will be pointed to correcting many of these things; like the Dummy series last spring for the year before. There will be a new website and it will be for the class and dedicated strictly to building. It will be pointed toward the new people coming our way and those that have never built an EC12. Maybe it will be a lure. Just remember this, if we publish a mistake here, it will not be just DMYC that stumbles; many will follow and their disappointment may thin the herd at our playground. It is in your interest to be our quality control. Please sound off at the slightest hint of a concern in what you see here.
|