Round Mast Prep
![]()
![]()
![]()
![]()
![]()
![]()
![]()
![]()
![]()
![]()
|
Round Mast Prep
|
|
Last update, January 8, 2010
Mapping the Mast
Parts: 11.1 mm Groovy Mast, #009, MMY or 12.3mm round mast, special order, MMY
Supplies: Blue tape Pencil
Tools: Drill Drill Press Drill Press Vise Drill bits and wire drills Drill jig or piece of L angle metal Long ruler or tape. Dremel Dremel 9909 cutter
General Points The mast is the base for the rig and the environment for the sail plan. The concept of this rig is the ability to utilize a smaller diameter grooved mast section thus reducing windage and weight aloft. The dual spreaders keep the mast aligned to the centerline of the boat. The angle of the spreaders allow precise bend (tuning) to the mast by tension on the shrouds only and independent of backstay tension. This is all done at deck level and can be locked.
All rigging parts needed are fitted for this mast and replacement of the mainsail is completed in just a few minutes. The booms have been engineered for a variety of rigging and control needs and easily adjusted at waterside. The details are in the building descriptions in the following pages.
The builders comment is that this is an upscale rig and the costs reflect this. However, if you are into the finer points of tuning with clean rigging aloft and sturdy control points, this rig is a joy to work with in the shop and at the lake. Make no mistake in your reading here, there are a lot of different things presented here from the Classic Rig but it does not require a steep learning curve.
Like all things that are new, there are things to learn and as individuals there will be many innovations.
Mapping the Mast This is to record some numbers in a new project for future reference and to make sure all the noted areas are covered. Mapping begins at the deck and ends at the highest level of the crane and its extensions. The consideration this first time is that you need to be no more than 1829 mm (72") for the A rig from the deck and the jibstay mount no more than 1500 mm (59") from the deck . This is class rule and these are hard numbers.
Three rigs will be built; the light air A rig, the heavy A rig and the B rig. All have different numbers under considerations here for their use in certain conditions. This is new thought and is presented for what worth it may be.
In light air conditions you would want to be the tallest you can be to reach the lightest of air movements. The heavy air A rig would be lower to the deck and with a sail cloth that could take you into a range around 10 knots of air. Above that your sailing skills will dictate when the B rig would come into play. This a shorter rig and with heavier sails that can sail into breezes around 20 knots before leeway begins to occur. If you study the specifications for the A and B sails you will see that both have near the same foot dimensions. Understanding this reasoning the B rig is shorter and depends on the air lower to the water for its power. The performance of the heavy A rig and the B rig in the breezes specific will also have reference to the sea conditions. This too lends to a lower sail plan and your tuning for higher driving power of those sails.
Here are the numbers chart that were developed and used for this project. The boom mountings will be the last to be the last installed on the mast. The gooseneck mount to the mast is to the top of that mount. There is no measurement for the vang mount, as it set on top of the mast butt insert.
Note: Emergency shroud mount holes will be drilled in the leading edge of the mast, as noted on the chart. This is specific to a Delta set up and optional in your building. Two emergency shrouds will be prepared with a hook on one end for the hole drilled and wire long enough to attach the connector to the chainplate. These will be stored in the sail case. The reason for this preparation is to reduce the time and stress needed to build a new shroud when one breaks in a heat. Removing the crane, head fitting and creating a new internal tang is pushing the time between heats. Yes, we have been doing it but why not at after the day with a drink on the table.
File out the taper of the pin on the mast butt insert. File or grind down the pin to match the depth of the mast step. This is 1/8" here. Do not secure this part till in the Assembly section.
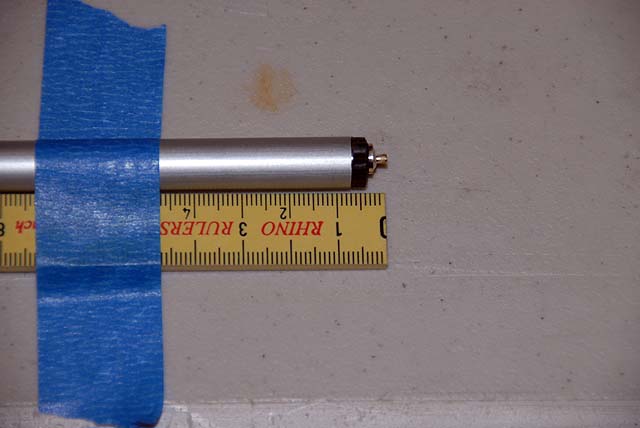
The mast and a folding ruler are taped down together with the heel of the mast at 7 mm. This will make all marks on the mast from the deck. The metal pin on the heel insert will be just resting on the aluminum plate under the acrylic mast step. If your mast heel fitting is different that shown here, compensate with the ruler set up.
Mark all the colored numbers. Use a lead pencil with notations so you know what is what. Check it again, carefully.
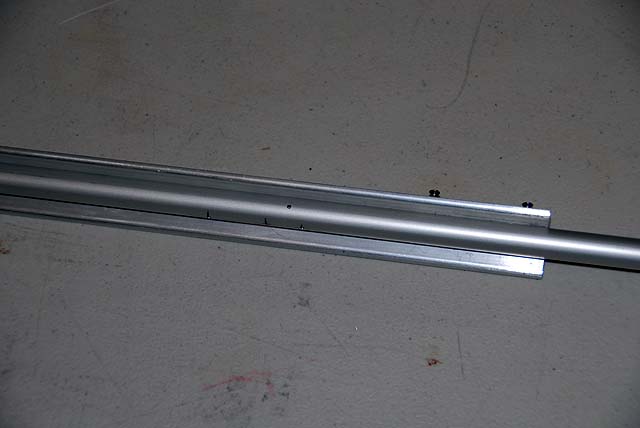
Preparing the Mast Set up to drill with whatever you will use. A stock piece of aluminum angle was set up so two screws would slide through the groove on the mast. These screws ended ups not needed, as the flat of the groove surface will lay in the angle stock and setting up a perfect right angle for drilling. Just secure it flat to the groove and hold it with a clamp, tape or fingers. A #49 bit was used for all the leading edge holes and a #53 bit was used for the spreaders.
Did you check the numbered markings again?
All the blue numbers will be centered on the leading edge of the mast. Remember, when drilling to stop when you break through so you do not damage the inside of the groove extrusion.
The pink numbers are the spreader posts. Drill all the way through till you are stopped by the angle or you feel it. When you punch through one side feel for the inside of the other wall ease up so the bit does not slide till it gets purchase. Start the drill dead center, if not just a bit forward to the leading edge of the mast. Either of these will clear the groove extrusion. If you hit that extrusion you are in trouble for a nice straight spreader.
There are three shrouds on each side of the mast to install. These are connected to internal tangs. Carefully center the mark where they will be and follow with the Dremel cutter bit then drilling with a #73 wire drill as described in the Internal Tang section located at the top of the Sail Rig section. The tangs will be installed later.
Note: Make sure the marks for the shroud wire hole is 10-12 mm below the spreader holes. This measurement will allow the tang to clear the spreader hole and not interfere installing them.
The cobalt wire drills are recommended. There is less breakage and it is easy to see when sliding the drill in and out when burnishing the hole.
Double check where the mast is to be cut at 1812 mm. Cut it.
Go do the booms and we will be back to the mast in Assembly. |